


Recent Blog Entries
- How to Identify and Prevent Batch Effects in Longitudinal Flow Cytometry Research Studies
- Making the Most of Quarantine
Share
Setting Up Your SpectroFlo Analysis Workstation

If you don’t have time to complete all of your data analysis at the Cytek® Aurora or Northern Lights workstation, no problem – follow the recommendations and installation steps below to take SpectroFlo away from the lab to your analysis workstation at home or in the office.
Preparing to Install SpectroFlo
Before downloading and installing SpectroFlo, there are a few things you should know:
- SpectroFlo was designed to display on on a 4K monitor, which is 3840 x 2160. The Aurora ships with a 32 inch 4K monitor, and the Northern Lights ships with a 28 inch 4K monitor. If you want to mimic the large analysis area you get while running the system in the lab, be sure to invest in a nice monitor.
- The computer configuration details for the system’s workstation are below. Please be aware that if you run SpectroFlo on a computer configuration that does not meet these specifications, you may experience slower performance than what you’re used to:
- Intel Core i7-8700 6-Core up to 4.60 GHz
- 64GB DDR4 Memory
- 1TB SSD + 1TB SATA Hard Drive
- 8GB Nvidia GeForce GTX 1080, DVD Burner
- Windows 10 Pro
- SpectroFlo currently only works on Windows 10 operating systems, and on computers with language default set to English. If your computer default language is not English, you will encounter issues during installation and likely won’t be able to open the software. If you have a Mac, you can try running a virtual machine, or dual booting, to run SpectroFlo. Please note that Cytek does NOT test any configurations other than Windows 10, so use at your own risk. I currently run SpectroFlo on a 16-inch MacBook Pro while dual booted in Windows 10. If you go this route, be sure to partition a good amount of hard drive space so you can handle several large data sets at once without filling up the partition.
- You’ll need to purchase and plug in a SpectroFlo USB license dongle to your computer to log in and use the software. Through the end of June 2020, current customers that are working from home can access a special SpectroFlo Limited License edition that can be downloaded from the Aurora User Community and used without a dongle. Once the Limited License version expires, you need to uninstall it, and install the regular licensed version of SpectroFlo to continue analyzing data remotely. You can work with your TAS to get the latest installer for the licensed version of SpectroFlo.
- Please read through the software release notes before installing or updating the software. There is useful information about bug fixes, new features, and installation information in these notes.
Installing SpectroFlo
- Download the SpectroFlo installer. You can get a licensed installer from your TAS, or the Limited License installer from from the Aurora User Community
- Run the installer and follow the instructions. If you need help, refer to the instructions in the Release Notes. When prompted for the instrument configuration, choose the configuration that matches your cytometer and choose the loader to access the loader options in the software interface.
Note: The most common issue people encounter when installing SpectroFlo is getting the Microsoft SQL Server 2016 Service Pack 2 to install, as many institutions’ IT restrictions block the download from occurring automatically. When that download is blocked, SpectroFlo will not run. If you encounter this issue (error message shown below), try manually downloading and installing the SQL server first, and then run the SpectroFlo installer.
- Once the installation is complete, there should be 2 icons on your desktop – one for SpectroFlo, and one for the SpectroFlo Data Maintenance application. Double click the SpectroFlo icon to open SpectroFlo. On some computers, it may take a few seconds for SpectroFlo to open. Once the software opens, log in. The default Admin account is username “Admin”, password “Admin”.

- If you encounter other installation issues, check out the frequently asked questions at the end of this blog and the troubleshooting tips in the Aurora User Community. If help cannot be found there, please contact your TAS or post the question in the Aurora User Community Software Releases folder and someone will reply back with an answer.

Replicating the SpectroFlo Instance from the Cytometer
There may be a few items from the cytometer computer that you want to take with you. Below are instructions to help you migrate various useful items.
Transferring Experiments
There are a few different ways to do this, I’ll only discuss the easiest one here. Log in to SpectroFlo, go to Acquisition, and open My Experiments. Select all of the experiments you want to export (hold Ctrl while clicking, or Ctrl + Shift, to multi-select several experiments), then right click and choose Export. Export the experiments to the Desktop, then copy them to your external data storage device. If you try exporting directly from SpectroFlo to an external storage device, the export takes a significantly longer time to complete. It’s much faster to export to the computer Desktop first, and then drag and drop into a web browser or an external hard drive folder to transfer the data elsewhere. To see a video tutorial on how to export and import experiments, watch it here on YouTube.
Each experiment is exported as a ZIP file. Transfer each ZIP to your remote analysis computer – again, it is fastest to place the files onto the computer first and then import directly into SpectroFlo, rather than importing directly from an external storage device. Then, log in to SpectroFlo, go to Acquisition, and click Import. Select the experiment ZIP file and click Open. Note: You may be prompted asking if you want to overwrite a worksheet(s) if a worksheet with the same name already exists on your computer, as the experiment ZIP contains all of the FCS files and any linked worksheet templates too.
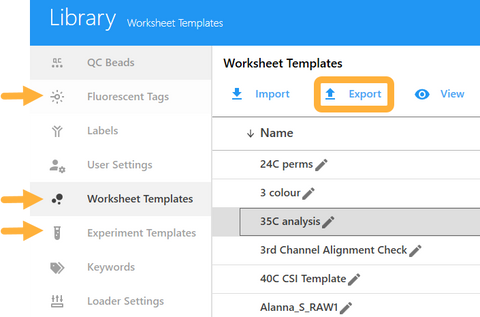
Transferring Templates and Fluorescent Tag Lists
If you have any worksheet templates, experiment templates, or custom fluorescent tags that you want to migrate to your offline analysis station, be sure to grab them from the Library module in the software. You can use Ctrl key while clicking multiple items to export, then click the export button and choose an export location. Import the items into your analysis workstation by logging in, going to the Library module, and importing each item into the section where it belongs.
Transferring QC Reports
If you wish to reuse stored reference controls in the QC & Setup module or any files in your Experiments to normalize and denormalize as if you were at the cytometer, you’ll want to take the cytometer’s QC reports with you to your analysis workstation. To do this, close SpectroFlo on the cytometer computer. Open the Data Maintenance utility. Click the Instrument Data/User Accounts menu, and click Backup next to Instrument Data Backup.

Transfer the exported ZIP file to the analysis workstation. Open the Data Maintenance Utility (again, make sure SpectroFlo is closed as only SpectroFlo or the Data Maintenance utility can be open at once), click the Instrument Data/User Accounts menu, and click Restore next to Instrument Data Restore. Close the Data Maintenance utility. Open SpectroFlo, log in, and verify that the QC reports are visible in the QC & Setup module.
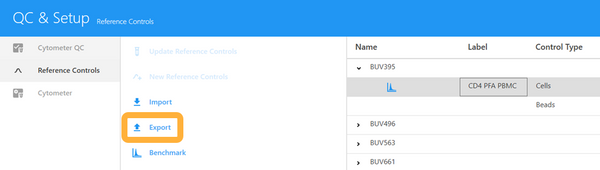
Transferring Reference Controls
If you have stored reference controls on the cytometer computer, go to the QC & Setup module, select Reference controls, and click the Export button.
Select all of the controls you want to export, or simply click Select All to check all of them.
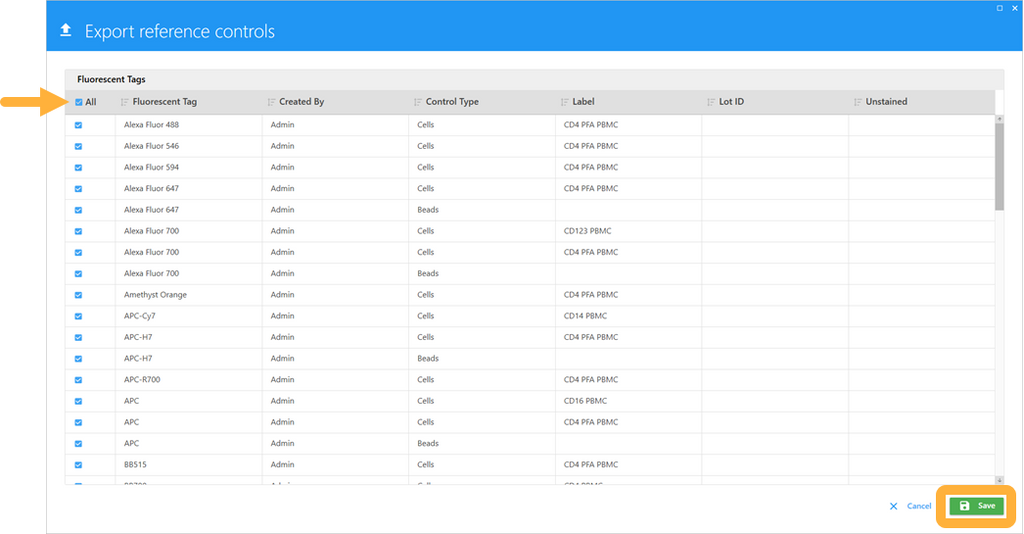
Export the files to the desktop, and then transfer them to your external media device. To import into your analysis workstation, log in and go to the QC&Setup module, select Reference Controls, click Import, and choose the reference control ZIP file.
To help you and your fellow Aurora and Northern Lights users remember these steps, download and refer to this one page Instructable:
Download Instructable: Export Reference Control Library
Working with Experiments from Multiple Cytometer Configurations
If you are working with data from multiple different instrument configurations, re-unmixing data becomes a little tricky. Here’s why:
- If you have a 5L dataset and import the experiment into a 3L configured SpectroFlo, open it and go through the Unmixing wizard, your only option at the end is to Unmix, Save, and Open – if you press the Live Unmixing button, an error message will appear. The nice thing about the Live Unmixing button is it keeps the raw and unmixed data files together in the same SpectroFlo experiment. However, use of Live Unmixing expects the data parameters to match the software configuration and when they do not, an error message pops up to alert you of this.
- If you want to re-unmix 5L data using stored reference controls, you can only do so if the software is also configured for 5L and the stored controls and QC reports are from the 5L instrument. You cannot unmix 5L data with controls acquired and stored on a 3L instrument, or vice versa.
- You could unmix everything in the Extra Tools > Spectral Unmixing module. This approach can be a little more tedious as it lacks the structure of the SpectroFlo experiment, so fluorochrome labels need to be re-entered in and the unmixed data is exported to a location of your choosing, then you have to re-import the files into SpectroFlo to analyze them. If you want these files structured as a SpectroFlo experiment with a defined Reference Group and Sample groups, you need to create an experiment and import each FCS file into the tube or group.
If you want to use that Live Unmixing button to keep all of the data files in the same experiment, then you’ll need to change the software configuration to match the dataset. Making this configuration change will also allow you to unmix with stored reference controls – again, assuming that the controls were acquired on the same configuration as the dataset of interest.
Download a set of configuration files and the instructable below on how to change the configuration.
Download Instructable & Config Files
SpectroFlo Frequently Asked Questions
Can SpectroFlo be installed on a server and accessed remotely?
SpectroFlo was not designed to be deployed on a server.
Can SpectroFlo be installed on emulated Windows 10 on any other systems such as Mac?
SpectroFlo is only guaranteed to run on original Windows 10 systems. That being said, if you have a Mac, you can try running a virtual machine, or dual booting, to run SpectroFlo. Please note that Cytek does NOT test any configurations other than Windows 10 systems.
Why did I encounter an error during while trying to install SpectroFlo?
SpectroFlo installation could be blocked by system anti-virus tools or firewalls. In these situations, it is necessary to temporarily disable those services before running the installer.
SpectroFlo installation could be blocked if the Windows user account has extra security to enforce a strong password policy. The SpectroFlo installer needs to install and create an SQL Server database (“RAINBOWDB”) and setup the password for the database. The security policy needs to be relaxed to for the installation to work.
SpectroFlo installation might be able to complete under an administrative account of Windows 10, but when SpectroFlo is started nothing happens. This can occur if there is extra security enforced by administrator accounts that prevents SpectroFlo from connecting with the SQL Server database (RAINBOWDB) or from creating the needed data folders. These security measures need to be relaxed for SpectroFlo to work.
Are there any special steps required for SpectroFlo to work correctly if I am planning to place the computer on my network domain?
Yes there are. Please follow the steps below if you are placing the cytometer computer onto a network domain:
- Remove security policies around the devices needed to run the cytometer
- There are 2 devices that are needed. One is a port that controls the fluidics, and another is a USB needed for data acquisition. First, find the fluidics port:
- Open Windows 10 Device Manager.
- Open Ports: see list of Port
- Disconnect the USB cable that goes from the instrument to the computer (there is only one cable going from the instrument to the computer, that is the one you need to disconnect).
- As soon as you disconnect, you will see one of the Ports originally listed disappear (it varies across systems, it can be COM 3 or COM 6, for example). That is how you identify the first port for which you need to allow user access.
- Next, you need to identify the second device:
- Still under Windows 10 Device Manager, go to Universal Serial Bus Controller: in there, find Cytek Aurora DAQ. This is the other device you need to allow user access.
- Once user access has been allowed for these 2 devices, open SpectroFlo software, login as Admin, turn on the cytometer and see if you can connect to the cytometer.
- If step 1 fails, and you still cannot connect the cytometer, please try removing the computer from the network and running it as a local machine. Ideally, we would like to login the computer as we originally did, User Name: Aurora User, Password: Welcome#1. Also, please make sure that you login to SpectroFlo as Admin.
- If step 2 fails, then we would like to get a log file that will allow us to see what prevented the connection. The log file can be found under C:\CytekbioExport\ApplicationLog_MM YYYY.txt. If there are several of these log files, please copy the latest one and send it to Cytek for assistance.